Monday, November 21, 2011

Answers to Quiz/Party game : Flowers

The answers to the Quiz/Party game : Flowers are being posted here.

Hint : Flame of forest  -        Gulmohar

1. A hollow cylinder + Rose - Tuberose
2. Brings life to a mud pond - Lotus
3. The first 3 letters mean a kitchen utensil - Pansy
4. Symbol of purity - Lily
5. Donald Duck's girlfriend - Daisy
6. Linked with a U.S. state - Virginia creeper
7. A delicious vegetable of the winter - Sweet Pea
8. Princess - Jasmine
9. It's the coolest one - Ice plant
10. You find it normally in villas - Bouganvilla/Bougainvillea
11. Begins with a happy mood - Gladiolus
12. Used in abundance in marriages - Marigold
13. The first three alphabets are a vehicle - Carnation
14. The universe - Cosmos
15. Loves to live in a button hole - Rose
16. A rainbow colour - Violet
17. Queen of night - Raat ki rani
18. The last two letters mean an animal - Phlox
19. Has narcotic effect - Poppy
20. Children love it the most - Candytuft

Hope you enjoyed.

Until next time.
Take care and help nature.
Mihika

Tuesday, November 15, 2011

Quiz/Party game : Flowers

Nature lover....???Love the beautiful sight of  flowers.....???Go to flower shows once in a while.....???Let's check........:).In this quiz you have to guess the name of flowers.Tricky one for some people and an easy one for others who are fond of gardening.So give it a try or use it at a party/kitty/ladies meet.....

Hint : Flame of forest  -        Gulmohar

1. A hollow cylinder + Rose
2. Brings life to a mud pond
3. The first 3 letters mean a kitchen utensil
4.Symbol of purity
5. Donald Duck's girlfriend
6. Linked with a U.S. state
7. A delicious vegetable of the winter
8. Princess
9. It's the coolest one
10. You find it normally in villas
11. Begins with a happy mood
12. Used in abundance in marriages
13. The first three alphabets are a vehicle
14. The universe
15. Loves to live in a button hole
16. A rainbow colour
17. Queen of night
18. The last two letters mean an animal
19. Has narcotic effect
20. Children love it the most

All the best.If you wish you can leave the answers of as many as you can crack as comments.Please do not google search.That's not the spirit......:)

The answers to this party game are out now.You can find them here.

Until next time.
Take care and help nature.
Mihika

Thursday, September 22, 2011

Tutorial - Diwali / Xmas folding paper lanterns

I have written down this picture tutorial for making paper lanterns, which can be used for special occasions like Diwali,Xmas,New year,formal parties,for brightening up kids rooms or for the lantern festivals celebrated in different parts of the world viz China,Japan,Indonesia,Malaysia,Singapore.

For making these lanterns you'll need-
24 Long bamboo sticks,
8 Short bamboo sticks,
Suitable paper(Please check about the fire safety of the material),
Punching machines,
White glue,
Scissors,
Some pieces of string,
A small piece of buckram.
Fire retardant spray for paper


1-First take the bamboo sticks-7.8 inches long and cut them at an angle at both the ends as shown in the image above.You'll need 24 of them for a single lamp.Then for the shorter bamboo sticks you need to cut 2.8 inches long sticks and also cut them at an angle from both the ends.You'll need 8 such small sticks.

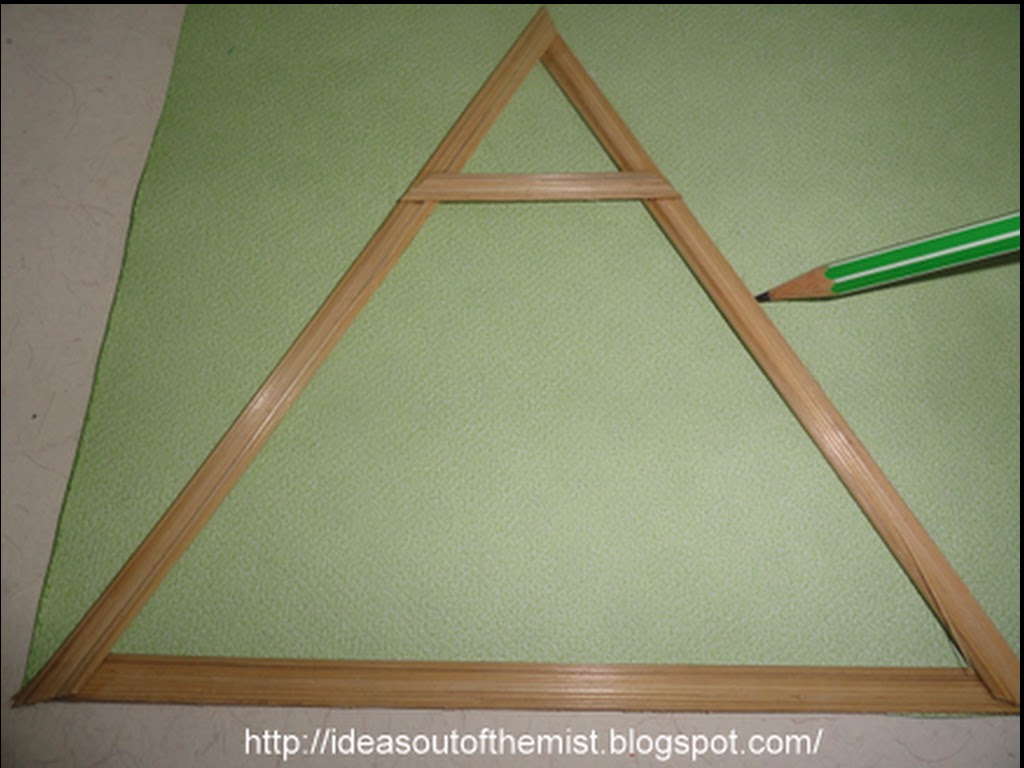
2-Then take 3 longer ones and a short one and using White/PVA glue form a shape as shown in the image below.You will need 8 such triangle shapes.

3-Then, place this shape on the reverse side of a paper(treated with fire retardant spray) and trace the outlines(not the complete outlines from the bottom till the smaller bamboo stick).

4- Cut out the paper and paste it on the frame as shown.You have to repeat steps 3 and 4 so that you get 4 such pieces.

5- Cut out another piece of paper by tracing it on another triangular frame and using punching machines cut out shapes in a pattern of your choice.I used the punching machine on the 3 sides.

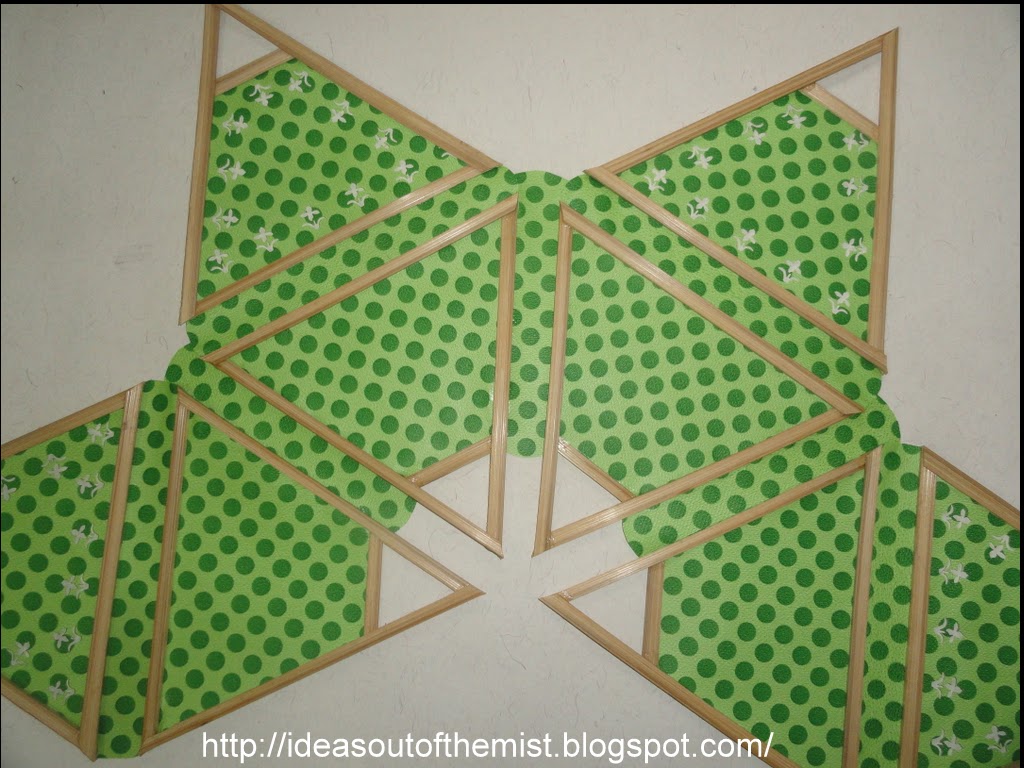
6-Then paste the final shape on the frame and it will look somewhat like below.Repeat steps 5 and 6 and make four such frames.

7- By now you have 4 plain frames and four punched ones.So take two frames-a plain one and a punched one, and a thin strip of paper(approx 8.2 inches by 1.5 inches),rounded at the edges.

and paste them together as shown below.

8-Repeat step 7 four times and you'll finally have 4 such frames.

9- Now take two frames from the above step and another strip of paper(6 inches by 1.5 inches approx).

10-Join the two pieces together using the strip of paper.Then take another frame from step 8 and another strip of paper and join them in a similar fashion.Keep repeating this until you have something that looks like this.

11- Now attach the 4th piece to the 1st one and you'll have a shape like this.This is a view from the top.

12- Tie thread at the 4 free ends of the lamp.
  
13- Now take the piece of buckram,cut it in a flag shape and pass all the threads through it.Now very carefully seal the ends of buckram till more than half way through,taking care not to glue the threads.On drying this flag shape piece can move up and down and help in keeping the shape of the lamp.

14- The final lamp will look like this.


I also tied some beads at the lower end.The beauty of this lamp is that it can be folded and occupies as little space as this.

WARNING : Please do check about the fire safety of the paper before using it and use a very low wattage light to avoid any mishappening....And use fire retardant spray for paper.Do not use candles or other such burning things inside the lamp.These lamps are for outdoor use only.

Hope that you liked the tutorial .Will also post a video tutorial for this soon and that might help if you feel that the instructions aren't clear with the images.

Don't forget to follow us on Facebook,Pinterest,Google+ to stay connected and get latest updates.......:) 

P.S. You can find another super easy version of our lamp tutorial from HERE


A third version can be seen HERE.


So,until next time.
Bye and take care,
Mihika.

Sunday, August 7, 2011

Happy Friendship Day

It's friendship day again.I made some friendship bracelets along with my kids,for their friends.
The pink and blue one was done by my daughter and the yellow and red one by my son for their respective friends.

The multicolored arrow shaped chevron bracelet was done by my son for himself.......:) and the pink and red bracelet was done by my daughter for herself again.........:)


So we made these 4 friendship bracelets this year.The kids enjoyed and so did I.These are easy to make.The only trouble was finding the right thread in this town which limited us to have only 4 colour combinations.

 So this is it.The kids enjoyed making them as they could choose their favourite colour combinations and one can easily see the pride on their face once they finished their work.

Happy Friendship Day to all of you too......:)

Until next time,
Keep smiling
Mihika.

Tuesday, August 2, 2011

Answers to quiz : Mindbender

The answers to quiz Mindbender are here.

1.    12 = S of Z                        12=Signs of zodiac
2.    54 = C in a D (with the J)   54=Cards in a deck (with the jokers)
3.    8 = P in the SS                   8=Planets in the solar system
4.    90 = D in a RA                  90=Degree in a right angle
5.    24 = H in a D                    24=Hours in a day
6.    7 = W of the W                 7=Wonders of the world
7.    100 = P in a R                   100=Paise in a rupee
8.    28 = S in I                         28=States in India
9.    3 = C in the IF                   3=Colours in the Indian flag
10.   31 = D in D                      31=Days in Dec
11.   60 = S in a M                   60=Seconds in a minute 
12.   32 = T in the M                32=Teeth in the mouth
13.   29 = D in F in a LY           29=Days in Feb in a leap year
14.   64 = S in a C                    64=Squares in a chess board
15.   6 = D in a PC                   6=Digits in postal code
16.   5 = R in P                         5=Rivers in Punjab
17.   7 = C in the W                  7=Continents in the World
18.   5 = O of the W                 5=Ocean of the world
19.   7 = D in a W                    7=Days in a week
20.   4 = S in Y                        4=Seasons in an Year


Hope you enjoyed it.

Until next time,
Take care.
Mihika

Wednesday, July 27, 2011

Quiz : Mindbender

This one is a very popular and common quiz played in military circles.See how many of them you can crack.The instructions are simple.You have to guess the words associated with the number..
For eg. In 26=L of A, it will be----26=Letters of Alphabet.Simple isn't it.......:)


1.    12 = S of Z
2.    54 = C in a D (with the J)
3.    8 = P in the SS
4.    90 = D in a RA
5.    24 = H in a D
6.    7 = W of the W
7.    100 = P in a R
8.    28 = S in I
9.    3 = C in the IF
10.   31 = D in D
11.   60 = S in a M
12.   32 = T in the M
13.   29 = D in F in a LY
14.   64 = S in a C
15.   6 = D in a PC
16.   5 = R in P
17.   7 = C in the W
18.   5 = O of the W
19.   7 = D in a W
20.   4 = S in Y


The challenge is how many of the 20 can you get in 10 minutes.If you wish you can post the answers as comments below.The answers to this quiz will be posted in a while......:)


The answers to this quiz are out now.You can find them HERE.

Until next time
Keep smiling.
Mihika

Tuesday, March 29, 2011

Baby gift : Diaper Cake


Diaper Cake


I made a different kind of a cake for my new born niece this year.A cake which she can start using right now....;)It had diapers,teethers,baby bottle,handkerchiefs,baby dresses,socks,some random toys.I mean it had all the little things meant to be gifts for baby assembled together as a cake.I am sharing some pics if you wanna know how this diaper cake was put together. 


The first tier of the diaper cake was set on a pretty tray.

Then I added two more tier of diapers and inserted a smiley stick in the center.

Embellished it with ribbons and tied a pull string musical toy to it.

Added some more gifts and useful things like baby bottle and teethers.

This was a baby sock which I turned into a pretty flower.

Isn't it cute???

Some more flower buds which will adorn a cute baby's feet.

Some handkerchief for baby were converted into small candles.They were placed randomly to adorn the cake.You can find instructions on how to make these from this link-How to make handkerchief candles.

The diaper cake in its full glory.........:)

Enjoyed making my first diaper cake a lot.It was not only pretty at sight but had all the useful things too and I loved it.

So, until next time,
Keep gifting in style :)
Mihika

LinkWithin

Related Posts Plugin for WordPress, Blogger...