Thursday, December 26, 2013

Favourites from the year 2013 : A review post from Ideas out of the mist

Hey everyone,
          As the year ends I'm putting together some of the popular posts from this year.In case you missed any, you could check them out by clicking on the appropriate link given below this picture.


Jan had the post Balloon arrangements for birthday party-A rainbow and some flowers

Balloon arrangements for birthday party-A rainbow and some flowers

Feb saw one of the most popular post on the blog ever.Would you believe it,if I say it has already got more than 40,000 views till today,in just around 11 months?Wow! that's some number.....Below is the link.

Fun paper game for ladies kitty party meet : Theme India and its colours

http://ideasoutofthemist.blogspot.in/2013/02/fun-paper-game-for-ladies-kitty-party.html


 May saw the post How to make a paper mache model / sculpture of Taj Mahal for kids school projects


http://ideasoutofthemist.blogspot.in/2013/05/how-to-make-paper-mache-model-sculpture.html

 May saw another post ,a first actually,the first guest post of the blog How to make a 12 / 24 hour clock of thermocol / cardboard / cd for school project

http://ideasoutofthemist.blogspot.in/2013/05/how-to-make-12-24-hour-clock-of.html

 Sept saw another very popular post How to make a beautiful handmade teacher's day card
It was a 3D card.
 http://ideasoutofthemist.blogspot.in/2013/09/how-to-make-beautiful-handmade-teachers.htmlhttp://ideasoutofthemist.blogspot.in/2013/09/how-to-make-beautiful-handmade-teachers.html
 Then some more simple teacher's day hand made and embossed cards.
Teacher's day handmade cards

http://ideasoutofthemist.blogspot.in/2013/09/teachers-day-handmade-cards.html

 Dec had the post that was pretty cute and fun to do.It was a homemade birthday party invite.The link is below.
 Cake and birthday party : How to make a unique handmade birthday party invite.

http://ideasoutofthemist.blogspot.in/2013/12/cake-and-birthday-party-how-to-make.html

So, that pretty much wraps up the year.Thanks for dropping by.We wish to see all of you in the year 2014.We wish you all the very best for a very successful new year 2014.

And don't forget to follow us on FacebookPinterestGoogle+ to stay connected and get latest updates.......:)

Until next time.
Take care.
 ^ , ^
Mihika

Wednesday, December 18, 2013

Cake and birthday party : How to make a unique handmade birthday party invite.

Hey everyone,

                 I'm super excited to share with you a handmade party invite, I created for a girl's birthday party.This card is surely gonna win the hearts of the invited guests.

It goes out as a slice of cake placed on a paper plate and accompanied with the invitation card.


So if you want to learn how to make this beautiful and stylish way to invite people,continue reading.....:)

Material required-

Paper plates
Handmade paper
Glue gun or any glue like fevicol
Thin cardboard to draw the template on
Dies and die cutting machine(optional)

Wednesday, September 4, 2013

Teacher's day handmade cards

Hey everyone,
            After uploading the 3D box card yesterday ,I'm posting some more pics of a few simple hand made cards ,we did using our bigshot machine and embossing folders.In case you missed our post from yesterday you can find it by clicking HERE.It comes with a step by step tutorial on how to make the cards(the ones in the pic just below).


The other cards we did were very easy to make using the embossing folders.We finished around 10 cards in less than 2 hours.So pics of the other cards which were made are below.


Tuesday, September 3, 2013

How to make a beautiful handmade teacher's day card

Hey everyone,
         After a long while, I'm back with an easy tutorial for a teacher's day card.It turned up nice and pretty.And the best aspect is it's 3D appearance.It looks like a box and as soon as you open the box.......bang , the box opens up and the walls start moving and slowly go down to reveal the beautiful inside of the card.This card can be made for any occasion and not just teachers day,like birthdays,anniversaries,invitation cards for ladies meet,kitty parties etc.


Another card -


So if you want to know how to make an elegant card which opens as a surprise for the recipient here is the tutorial to make it.

Material Required-
Handmade paper (red and green in my case) or any cardstock or thick paper
Fevicol,ruler,pencil,gel pens for writing
Embellishments (Ribbon,gem stones,paper flowers etc)

Skills required-
If you can handle measurements with rulers and scissors you can easily nail it.These cards were made by a fifth grader and a second grader with little help from outside.

Step by step tutorial for making the teachers day homemade card-

Step 1 -Take your handmade paper and cut it to the dimension 12" * 12" square.Then draw 2 horizontal lines(red lines) and 2 vertical lines (also red lines)  4 inches apart.I'm demonstrating on plain white paper so that you can see the lines really well.You can straightaway make the lines on your handmade or decorative paper.


Step 2- Now cut off the four corner piece(where it is written "Reject this piece")


Step 3-  Now you will be left with a piece that looks like this.Save the corner four pieces.
Let me tell you why.
If you use a paper that's double sided and has print on both the sides,you don't need those 4 pieces as the inside of the box is already nice and pretty.But hand made papers are usually very rough on the reverse side.It spoils the inside look of your card.So what I did was paste those 4 scrap pieces back on the 4 walls, so that the box had the same outer and inner shine.I also cut a 4*4 " square to cover the middle part.
Another alternate option that you have is to repeat steps 1-3 on another sheet of handmade paper and then glue the two of them back to back.


Step 4- This piece can now be folded like the picture below so that it starts looking like the beginning of the box.

Friday, May 17, 2013

How to make a 12 / 24 hour clock of thermocol / cardboard / cd for school project

Hello everyone,

              This is the first "guest post" of my blog.A little kid,a fourth grader made this 12 hour / 24 hour thermocol clock and I invited him over to write this post.This is also a good project for doing a best out of the waste kind of thing.The kid was in charge of everything from completing the project to taking the pictures.So without further ado here is the post.Over to him.

I have made a thermocol clock by first cutting out a piece of thermocol.


Then with the help of a compass,I marked the center point.The next step is make a groove at the back of thermocol.  


Then I removed the needles(by pulling them out) from the clock assembly and inserted the machine in the groove at the back of the thermocol as shown.You can use an old clock for getting the machine part or you could get it from the store where they sell clocks.They are easily available.  


On the opposite side,I pasted a paper and wrote the numbers 1 to12 in the outer circle & 13 to 24 in the inner circle.Therefore the clock can be read in both the 12 hour and 24 hour formats.Then I fixed the needles in the machine - first the hour one then the minute one and then the seconds one.  


So this was the project.Hope you can also make it!!!

See you soon,bye.

Well Thanks lil kiddo for writing this up.And that's it.The first guest post from a little kid .And yes you can also use a piece of cardboard or a CD to make this project.......:)
Don't forget to follow us on FacebookPinterestGoogle+ to stay connected and get latest updates.......:)

Until next time.
Keep smiling.
 ^ , ^
Mihika

Monday, May 6, 2013

How to make a paper mache model / sculpture of Taj Mahal for kids school projects

Hey everyone,
                Today I'm sharing with you some pictures of a paper mache model a fifth grader made.He did it mostly on his own with a little supervision.The topic given to him was - make a paper mache sculpture.Since he was reading Indian monuments at the time, he  was interested in making a model of Taj Mahal.So this is a 3D paper mache model of Taj Mahal,our very own beautiful Taj,built by the Mughal emperor Shah Jahan, as it stands proudly in the new seven wonders of the world list.

Material required - 
Cardboard boxes of appropriate sizes
Aluminium foil inner cardboard tubes
News papers
Paper napkins
Fevicol
Fevicryl acrylic white colour
Cello tape
Glue gun (optional)

 Steps to make the paper mache model -

Step 1- Collect the required material.You'll need some old cartons,one of a big size to be used as a base for the entire structure;And another smaller one to make the main body of the Taj.Then we also collected some paper tubes.You can use the aluminium foil tubes once you run out of the foil.We,however used tubes which were left from the plastic sheets for covering the books for school.However if you cannot find any paper tubes,don't panic and roll some newspaper and tape them to make paper tubes and they will work just fine.


Step 2- Cut out the base of the larger box.


Step 3- Tape the base you just cut so that the flaps don't keep opening up as you can see from the picture below.Next make a large newspaper ball to make the top part of the monument.Also cut out smaller cardboard pieces to make the side walls and fold them a bit.


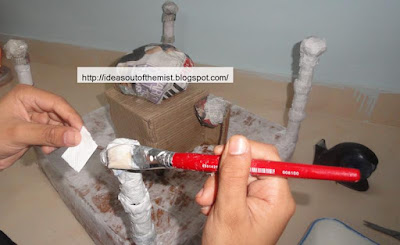
Step 4-Make some smaller paper balls and with some cello tape paste them on the side walls.Then paste the four paper tubes on the four corners of the base to make the minarets.We used glue gun for this part as they get glued instantly.(Pease note that glue guns are not for kids.This should be done by an adult because they are extremely hot).However,you can use fevicol and leave it for a while so that they glue well.Then make some even smaller balls for the top of the four minarets just built by your paper tubes.Roll some newspaper and tape it at regular interval on your minarets to give them some dimension.


Step 5- And now comes the paper mache part.Tear your paper napkins into small bits.Make a mixture of four part fevicol with one part of water.Add more water if the paste is too thick and difficult to work with.Now coat a part of the structure with the fevicol water mix and paste the paper napkin on top of it.Using brush, gently coat the top of the napkin you just stuck with your fevicol water mixture.Keep doing this until every bit and corner is covered.This is going to take some time but will make your model solid and rock hard.


Adding another picture.I hope that makes things clear.


Step 6- Once done,your model should look like this.We also added some tiny paper balls on top of the middle structure and some wire (actually pipe cleaners) to give it more dimension.Let this thing dry for several hours(best - leave it over night).


Step 7- And now the fun part,loved by the kids - paint.Paint, paint and more paint.We used Fevicryl hobby ideas, acrylic colours and painted everything white.


Step 8- Once you have finished painting,the job is done and your model of the lovely Taj Mahal is almost ready.Using a permanent marker we highlighted the main entrance and windows and other such features.


 Hope we helped you with our instructions,if you intended to make one.


Don't forget to follow us on FacebookPinterestGoogle+ to stay connected and get latest updates.......:)

Until next time.
Keep smiling.
 ^ , ^
Mihika

Wednesday, February 13, 2013

Answers to - Fun paper game for ladies kitty party meet : Theme India and its colours

Hey everyone,

The answers to  Fun paper game for ladies kitty party meet : Theme India and its colours are out now.The original post can be found HERE.

Example    : Went        -     Gaya

1.    Nectar head    - Amritsar
2.    Victory town   - Jaipur / Vijaynagar
3.    Saint hair         - Rishikesh
4.    Fort                - Durg
5.    Ear town         - Kanpur
6.    Mr.city            - Srinagar
7.    Face               - Surat
8.    Mustard town - Raipur
9.    God's door     - Haridwar
10.  Eye pond        - Nainital
11.  Snake town    - Nagpur
12.  Mischief colony-Shaitangarh
13.  Girl unmarried - Kanyakumari
14.  Sixteen town   - Solapur
15.  Ox village       - Belgaum
16.  Water leaf      - Panipat
17.   Ruling town   - Rajpur
18.   Yesterday cut- Kalkatta(Kolkata)
19.   Hand drama  - Karnataka
20.   Rising town   - Udaipur
21.   Three husband - Tirupati
22.   Claws             - Punjab
23.   Bead town      - Manipur
24.   Request          - Agra
25.   If lock            - Agartala
26.   Bring snake    - Sampla
27.   Jaggery village -Gurgaon

Don't forget to follow us on FacebookPinterestGoogle+ to stay connected and get latest updates.......:)

Take care.
 ^ , ^
Mihika

Fun paper game for ladies kitty party meet : Theme India and its colours

Hey everyone,
             I hope everyone is doing good.Today I'm posting a fun little quiz based on our country India.This can be printed and used at a kitty party / ladies meet or generally when you are hosting a formal dinner,to keep your guests entertained.
             All you have to do is guess the name of the place based on the given clues.

Example    : Went                        -     Gaya

1.    Nectar head    - ___________
2.    Victory town   - ___________
3.    Saint hair         - ___________
4.    Fort                - ___________
5.    Ear town         - ___________
6.    Mr.city            -___________
7.    Face               - ___________
8.    Mustard town - ___________
9.    God's door     - ___________
10.  Eye pond        - ___________
11.  Snake town    - ___________
12.  Mischief colony-___________
13.  Girl unmarried - ___________
14.  Sixteen town   - ___________
15.  Ox village       - ___________
16.  Water leaf      - ___________
17.   Ruling town   - ___________
18.   Yesterday cut- ___________
19.   Hand drama  - ___________
20.   Rising town   - ___________
21.   Three husband - __________
22.   Claws             - __________
23.   Bead town      - __________
24.   Request          - __________
25.   If lock            - __________
26.   Bring snake    - __________
27.   Jaggery village - _________

Hope you enjoy solving it as much as we enjoyed putting it together.You can post the answers as comments below.The answers to this quiz will be published in a while.Happy brainstorming till then.......:)


Don't forget to follow us on FacebookPinterestGoogle+ to stay connected and get latest updates.......:)

P.S. The answers are out now......You can find the answers HERE.

Take care.
 ^ , ^
Mihika

Tuesday, January 8, 2013

Balloon arrangements for birthday party-A rainbow and some flowers

Hello everyone,
                            I'm doing today a quick and simple post on pictures of balloon arrangements I did for a little girl.They can go well, if you have a rainbow theme or a floral theme for your party.So here are a few pics.

I did a rainbow banner kind of thing for the backdrop.


Below is the pic of balloon flowers I made.This time I also found the thin balloons used for balloon sculptures and made a stem out of them.


And here is a pic of the balloon columns.


So that's it.Don't forget to follow us on FacebookPinterestGoogle+ to stay connected and get latest updates.......:)

Did you see the handmade birthday party invite I made for this party?You can find the complete tutorial on it from HERE.


Until next time,
Take care.
  ^ , ^
Mihika

LinkWithin

Related Posts Plugin for WordPress, Blogger...